Kim Lucas Designs ~ Infused Creativity

Kim Lucas Designs  ~ Infused Creativity
Mixed Media and Creative Artist & Photographer

Saturday, May 30, 2015

Backgrounds

I have found that I love to slap, smear, drip, spread color  on a piece of paper...    In doing so I have created a multitude of color and texture.  The diamonds in this page I know are modeling paste, which I love an am so totally almost out of. 
I deemed one of my Dylusions journals a creative journal and no mistakes. That means if I create something it is what it is supposed to be.  I  create things as they flow and nothing is a mistake it is as real as anything and organic in creation.

One of my random backgrounds of colors I would not normally choose. 


This is the page two of the background as listed above. 
A fun technique I taught an a local elementary school for a night sky scene.  Water color blue and purple with a drizzling of salt to create the sky effect. 


This page shows all of my emotional writing and if you zoom in, I'm sure you could read up close. 


Gelli printing and stencils make for a very fun background. 


Tuesday, May 26, 2015

This Week's Art

Life is busy, but that doesn't mean I don't take time for art. All of this happened in the period of a couple day because I also working in my journal.  I often see the art of others and think.."wow, I'd love to know how to do that!" So you know what I do? I either dissect the project with my eyes and try to recreate my own version, or I find a tutorial online. A tutorial online? Yes, they have them for literally EVERYTHING!

I wanted to learn coptic stitching. Once I try something I'm pretty good with just knowing I know how now and I can re create them if I need to for other projects. It's always this "oh, this is just another thing" epiphany that the newest trend isn't the end all to everything art. I found the coptic stitched piece in my closet and it was begging for a cover so I cut up some thick cardboard with a utility knife and the painting ensued. This is the cover I ended up with. No particular design or idea was decided up front. I like to create as I go and add what feels right. I added the coptic signatures to the new cover with black strings tied at each stitch line. Not the easiest thing to do. I kind of like the black ribbons hanging here and there which add interest. I didn't at first but I've used the old leave it and come back technique with this one and so glad I did. 

 
I was inspired by the sky and stars to make a night sky/universe. I have not been a huge fan of watercolors, but let me tell you these are quality and they create texture and tack and they are beautiful in the pigments of the colors.  Layering of light from the middle, dabbed with a tissue, and layered some more, add splatter white and black dots and there you have it. I love how these turned out.
I have also been seeing a lot of the circle dot mandalas as I like to call them because that is so technically specific. (Bottom left). I started with white gesso on thick mixed media paper.  Then I painted circles using bring alternating colors. When those were dry I started adding the dots in similar colors using contrasting colors on each. Look pretty perfect and circular? Yes. Is it really? NO! Perfect imperfection for a fancy little circle of art. I used acrylic paint for this and the back ends of different sized paint brushes to create my circles. Thanks for looking hope you enjoy my work!


Wednesday, May 20, 2015

Accordion Book


Of the many art groups I participate in, I signed up to participate in an accordion book swap. I have never made an accordion book and I absolutely loved making this one.  I started with he cover before I made any of the pages and I just loved it so I used it even thought it was bigger than the inside pictures.  I used cardboard painted in black gesso, glued some map printed papers, and a harlequin diamond stamp that I stamped with a gold translucent acrylic paint. 

One of my favorite parts of this book was stitching the red front piece on like a corset and you will see better pictures below. 
This is the front side of all the pages. I used mixed media paper and sewed each page together around the edges with a zig zag stitch. Some I left open for pockets on the top.  I enjoyed using gelli printed papers as backgrounds and adding stamped images.  I added metal gears, embossing on certain stamps, washi tapes, and pieces from my new toy. A fiskars hexagon punch. 


A fun little stamped saying 
Tim Holtz ephemera key  I tied onto the front

The front of my accordion book

You can seem more clearly the chunkiness and the corset stitching on the side
This shows how the book stands on it's own, the close up stitching, and pockets


This is the backside of all of the pages. I used a mixed media stencil from Michael's with some grey acrylic paint. The black ribbons tie around the book a few times to tie it closed. 
I wil be making more.   


Monday, May 18, 2015

For the Love of COLOR!!!

Sometimes I just need to smear paint on a piece of paper. Whatever color grabs my attention, no theme or prompt attempted. Just a squirt of color on each page and a credit card. Smooth it out until it's dry and move to the next color. Usually that works for 5-6 colors and then I stamp images or scribble, cut some paper, glue down text, rip elements, stencil or add modeling paste for texture and depth. 
So much random fun here
  1. Embossed with gold
  2. Rubber stamps: clocks, and girl/zetti hat made by me
  3. Piece of paper made with blue and purple modeling paste over gears
  4. Fiskars hexagon punch pieces from under papers
  5. Stamp of Steampunk skull from Stampers Anonymous
  6. Wings stamped and embossed
  7. Black stabilo marks all pencil for shadows
  8. Smeared white gesso
  9. Borders, doodles
  10. White gesso smeared in random places to mute colors


Starting into my Steampunk Phase
  1. Distress ink by Tim Holtz on the background page
  2. Stampers Anonymous Tim Holtz Diamond stamp rubbed with blue inktense block and lightly painted cream
  3. Cut out butterfly ephemera
  4. Cut out Steampunk ephemera tags
  5. Silver aluminum tape etched to appear as metal
  6. Dylusions inks used not he Tim Holtz clock stencil 
  7. Black Stabilo marks all pencil for shadowing 

Into Time
  1. Clock cut out from 12x12 scrapbooking paper
  2. Remnants of the clock stencil and Dylusions ink from above
  3. Inktense blocks from color
  4. White gesso smeared
  5. Tim Holtz diamond stencil
  6. Dark blue Inktense block diamonds and outlining

Back to Steampunk  Wow..lots of colors here
  1. Background ripped under paper made with a gear stencil with gelatos on one side and Dylusions spray ink through the other (blue and gold)
  2. Dylusions spray inks in purple used in same gear stencil
  3. Modeling paste blue and purple Gears stencil
  4. Steampunk hat ephemera from online add black feather
  5. Tim Holtz rub on numbers and words
  6. Online royalty free ephemera steampunk lady, hot air balloon and gears
  7. Happy mail stamp from Wizard of Oz on yardstick 
  8. Steampunk themed black and white washi tape
  9. Teal acrylic paint smeared
  10. Gold embossed wing stamp on the clock
  11. White gesso to soften some edges
  12. Diamond Stamp background


Rise to the Occasion: Modeling Paste
  1. Smeared paint
  2. Inktense block colors to blend
  3. Cut 12x12 printed yardstick black with silver script
  4. Washi tapes in pink with white polkadots, blue and white zig zag, teal and blue
  5. Liquitex heavy body acrylic in blue
  6. Stabilo marks all pencil in black 
  7. Pictures printed of inkjet printer
  8. Printed lyrics to Eye of the Tiger
  9. Journaling sketches with black pen

Fun Color Smear (I'm having a great day) layout
  1. Blue, green, yellow, acrylic paints smeared with credit card
  2. Blue, green, yellow Inktense blocks used to blend colors and darker blue for edges and shadows
  3. Added ripped map paper for texture
  4. Stamped Diamond stamp with a layer of dark blue inktense block followed by a light smear of cream/tan paint. 
  5. Wing stamp inked with pink paint
  6. Dried scratchy brush used to scrap on pink and orange acrylic paint
  7. Wing stamp over stamped with white gesso
  8. Stabilo black marks all pencil for shadows
  9. Cut out ephemera from royalty free clock in hand
  10. Notes, Date tickets and stickers cut out from washi tape
  11. Tim Holtz rub ons
  12. White gel pen to scribble edges and add tiny circles
Hope you enjoy looking at these as much as I enjoyed creating them. Thanks for stopping by!


What's this? What's this?

I love Sally.  I love all things Nightmare Before Christmas.  SO much so, that last halloween when our other options had run out, we decided on this theme for our family halloween costumes. We generally have 2 big parties, a school event, AND trick or treating to get the use out of them. Since my kiddo decided on Oogie Boogie...The costume making began.  His costume was actually made from a burlap curtain from a thrift store, dollar store bugs, hot glue, yarn, and foam to mold the face around. Next was Jack Skellington himself. I tried to pick up a premade costume at the halloween stores, but all of the heads were plastic and melted or discolored..YUCK! So I found a japanese lantern in the most gigantic size I could find and paper mache'd so many layers I didn't count. The mouth actually has a screen for they eyes and wa-lah! Jack's head. The pants and coat again at the thrift store and the tie made from felt, gloves from a halloween store. Now for Sally. Yes, that was me. I didn't want to piece together all the correct parts of her outfit sot I found a remade costume online. It was perfect for the wig and everything else. I only added aqua tights. I found an amazing make up tutorial online and this was how it turned out. SO Sally! 


Now besides costumes being art, I used this in a journal layout which prompted the use of stitches. Sally of course is all in stitches so she worked perfectly! 
Here is how that page turned out. 

May the Nightmare that is Halloween continue! 


Friday, May 15, 2015

Steampunk Art Swap

Art is so subjective and includes many mediums and styles.  For an art swap in the theme of steampunk I thought I would try something new.  This week I have ventured into new territory and experimented with making my first pocket letter, my first altered altoid tin, and...my first time I've used my inktense blocks..that I've had since last October.  I have to say, I love the Inktense blocks, but I think I've broken EVERY one..Why are they so fragile??

Back to the steampunk.  I get the style, I really do. I love the industrial, the metal, gears, wings, inventions, crazy hats, goggles, and corsets. I have seen some really great steampunk halloween costumes through the years.

I started in on the tins.  Lots of modeling paste in the stencils of gears. I also have realized I really like to use the negative of stencils..meaning instead of dabbing and trying to get all the parts covered but not smooshed underneath, I paint the stencil itself and make a print basically. Clean easy, love it.
By far one of my new favorite creations.


I super duper duper enjoyed making my first altered tins especially with this steampunk theme. I can't wait for my swap partner to receive this in the mail. Thanks for checking out my art, I hope you enjoy looking at it as much as I enjoy creating it!

Tuesday, May 12, 2015

Octopus Love

I have a "thing" for octopuses, or octopi...apples and oranges.  I don't know why I love them, I don't have any fantastic stories, they are just crazy amazing creatures.  The Seattle Aquarium does house a rather large pacific octopus that I have had the pleasure of photographing many times.  After an art swap I made some "cute" little octopus themed pieces, but it was time to get out my big Canson mixed media pad and get to work on a real Octopus. 

I had a vague idea of where I wanted to start, but always have trouble keeping the art on the page, especially this large creature. 

I sketched a quick outline or what the body and legs might look like. I knew I had to account for 8 legs.  No one wants to look at a 3 legged squiggle octopus..as in "where did his legs go?" I used gelatos on the background in blue and green tones just to give it the feel of water. I knew the attention to detail was to be put into the creature himself.  Following the entire gelato smearing exercise, I concocted a light orange color which I dabbed all of the octopus in a random fashion. I was liking the texture it create because they are wrinkly and bumpy so I went with it. Some areas darker than the others, different tint and hues or oranges and brown. Shadowing in all the right places. I had a really dried out brush that kept all the bristles in a circular stippled pattern. I dabbed it a few times and those became my hi lights. I wasn't sure where to go next so I let him sit. 


He needed more bumps and texture...I grabbed a red/orange derwent intense watercolor pencil and drew loose red curves all over to give more depth to his textured skin. This octopus is really coming to life. I refused to pick up a black pen for outlining this project. I have realized that it takes away from the realism and adds a cartoony feel..That which I am not trying to achieve.  Next I needed the tentacles to have suction cups so those were a new to me part to learn but I loved him so much more!


Here is my finished piece.


These are my two favorite suctions cups of the whole piece. 


Just another fun shot. I also love his eyes so much. This one is going in a frame for sure :)


Monday, May 11, 2015

Collage off the Page


Collage off the page and onto a Mason Jar. Did you know that Trader Joe's Spaghetti Sauce is actually packaged in Mason Jars??? I did not! I love all their jars from jam, bruschetta, spaghetti, and lemon curd. I contain all sorts of art supplies from brushes to ribbon in these cleaned jars. I love the colors teal/blue/purple together and was inspired by the early Lifebook lesson jars. I wanted to make one of my own and it took awhile to get there. The clock on the front is from a 12x12 scrapbook sheet of vintage clocks.
As I rotate the jar this is the next image. I used iridescent medium to stencil in a gear stencil I purchased from Michaels. Some stencils are thick and sturdy and work with anything and some are thin as heck and need to be blotted with a sponge. That is the case with these, although I held it down securely and scraped over it with a palette knife with above mentioned medium on top of the blue and purple paint over matte medium. I am liking how this is turning out. 


Another turn incorporates this yellow pink stenciled piece from a Juile Fei-Fen Balzer stencil of a girls head with script. I placed it over some purple blue background stenciled with a circle stencil in varied greens. 
This is my favorite pattern I discovered by mistake. I had used gelatos on a stencil (circles from Jo Ann Fabrics) because I wanted to try it out and not have to worry about cleaning it before leaving it. (I am the worst at cleaning brushes..I will buy more since they all dry up). I had forgotten that the gelato was on the stencil so when I tried out my new Dylusions ink sprays...I pressed the stencil down then smeared over it, the ink placed itself on the outside and the gelato created these magical glistening circles. I hung this piece of under paper on my bulletin board for the longest time and wanted to use it in something that I could see all the time. Perfect, this was it!


And back the the clock image on the front. This jar creation was something new of mixed media that I had never created before and have no real "purpose" for.  When does art have to have a "purpose" if you are creating organically from your heart? This is that piece and if I ever find a true purpose besides looking really awesome as a piece in my art studio...I will let you know :)

Kim Lucas the Artist behind the Art

I am driven by art and my art is a direct expression of myself.  I have been working on many projects in my art studio, and one of the projects includes myself.  I feel deprived of the ability to breathe without creating for awhile, so I make it a priority to draw, paint, create, design, photograph, every day. If I only get to smear a few colors of paint on a layout I am good with that.  I don't look forward to weekends generally because I have no sense of the Monday through Friday grind aside form dropping my kiddo off at school and picking him up every day.

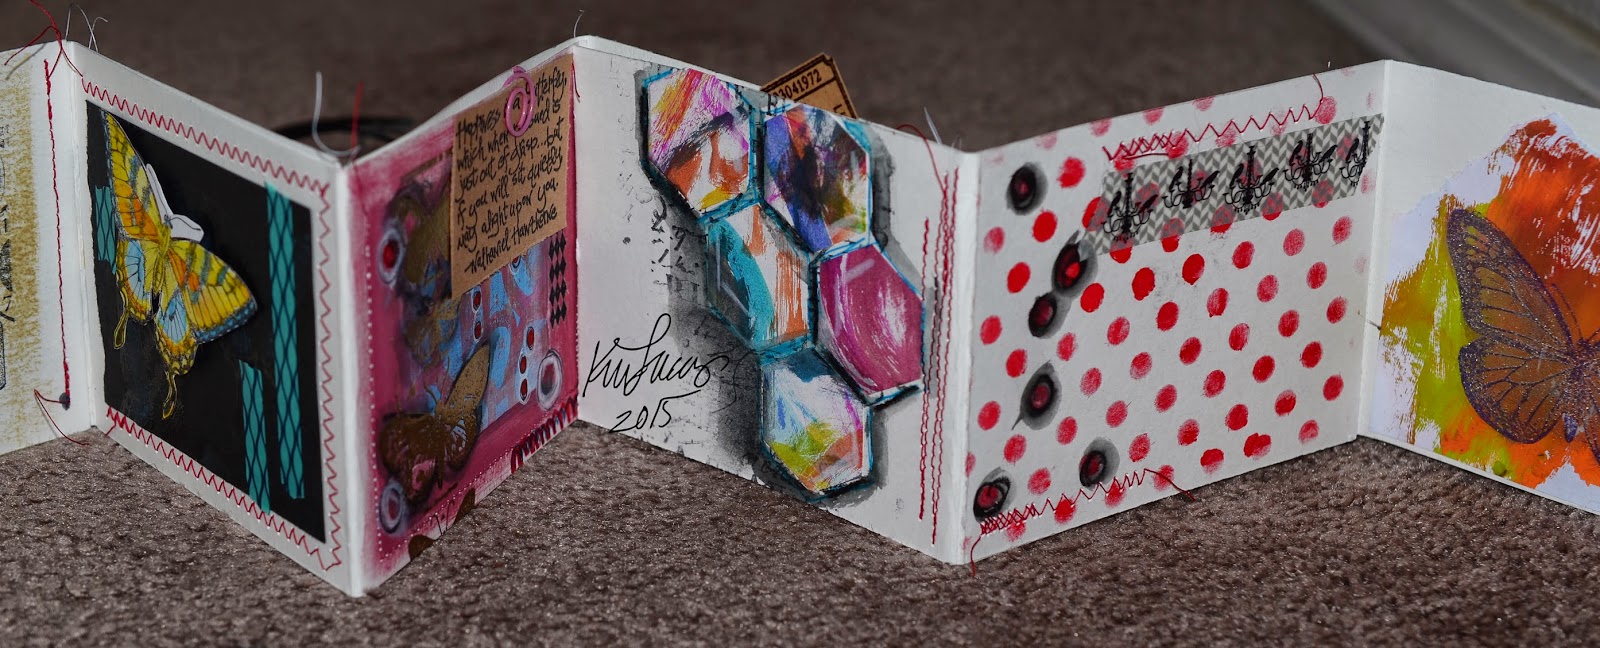
I do enjoy wearing my hoodies and jeans. I am not very creative in the wardrobe section of my life.  I have been creating some really fun pieces lately to include a collaged mason jar with some of my favorite ink/gelato/stencil marked papers.  I have given myself the opportunity to really sit and work with a piece instead of run right through with whatever time I can squeeze in.  I recently created a painted octopus on a large canson mixed media pad. I added so many layers, and for my love of the creatures I have never painted one. So after a few days and lots of details I can sit back and think "wow" I created this.  Enjoy my creation and be happy with alone time spent on me.

*(coffee, as seen above..is every day..I tried to quit today with the sugared espresso's but that was just silly!)

We live near the puget sound and have local access within  15 minutes of our house.  I have been out with my camera on a few occasions taking in the beauty of nature as our weather has been unseasonably warm, but very welcomed. I am always in awe of the clarity I fee after spending time with art in nature.

 Again with the coffee I know. I am pretty proud that I have cut out the unreliable, mundane certain box store coffee chain in the area.  I can whip up a treat at home in 3 minutes and it's probably got 8 full ounces of espresso in it. I love having a new flavor when the mood strikes.
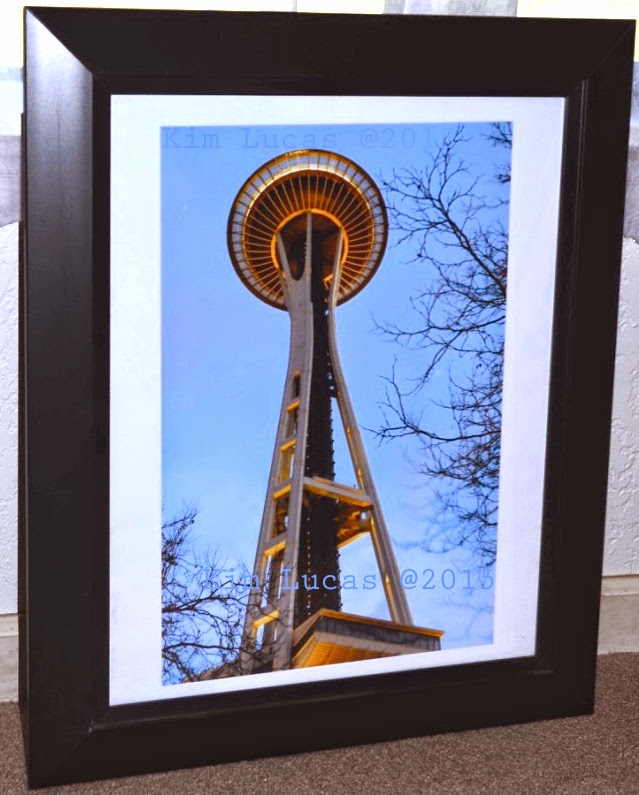
Being so close to Seattle, just a 20-60 minute drive depending on the traffic...(not kidding), I have taken my camera out there as well. I can never have too many shots of the Space Needle. This is one of my favorites I took on a night trip to the city.  My other favorites there include the Chihuly Glass Garden, the EMP building..(beautiful architecture and colors) AND the Key Arena where I have seen LMFAO..and my faves..Imagine Dragons.


My husband took this on his phone and I love it. Most of the time, I am the one taking the picture but this display of glass art is phenomenal. The Tacoma train station featuring Chihuly as well is beautiful along with the bridge...( I have pictures to post later). This was a  date night with fabulous art.
One of my favorite shots of the night is the reflection of the Space Needle in this Chihuly orb of glass.
I am grateful to my husband who knows and supports my hobby. Sometimes I have to put the camera down to focus on my family. I loved shooting the art in this location because Chihuly is such an amazing artist in his medium. 


Again with the photography, it is the one thing that really gets me out into nature.  I adore my macro lens and captured this little bug at another of my favorite beaches in Edmonds.  I am more an artist in all avenues of my life. Everything is art. Life is art. Art imitates life for sure.  Beyond the paint brush, the mixed media, and projects as such, the project I am working on at the moment is me.  I am inspired by all of these forms of art and they keep me afloat, but I am a writer, I am a dreamer, I am a student and all at the same time these things are trying to find their place in a happy harmony within my chaotic machine of a brain.  
So with this art, I am moving slightly more towards self growth and discovery and away from the "challenges" or prompts of others, that while are a fun diversion, cloud the real and important pieces of my life that deserve the most attention. Simply me.

Am I an Artist?

Yes. The answer is definitely YES! I have been creating artistically whether it be with a paintbrush and canvas, film and camera, or pencil ...