Kim Lucas Designs ~ Infused Creativity

Kim Lucas Designs  ~ Infused Creativity
Mixed Media and Creative Artist & Photographer

Friday, July 25, 2014

Metamorphosis... personal growth and development through art

I have always been an artist. I am inspired by everything in life, music, nature, color. When I started the DLP journal. I was just throwing down things onto a page. Each week the challenges seemed interesting...in the beginning. Once a couple months passed. I realized I was limiting myself to the prompt of strangers. I had to step back and take a good look and ask the question..when in my life have I ever followed what others said or told me to do? Even in directives, I put my own spin on everything. I am not a copy of anyone else, nor should my art be.  

Journaling comes naturally to me. The writing part that is. I can sit and write and what is in my head magically flows onto the page. I have no loss of words or ideas, in fact I may have too many. In all mixed media and forms of art that I have created the short list goes like this: scrapbooking, card making, Stampin' up, drawing, oil paintings, photography, playing piano, writing music (nothing special) just by ear, creating sculptures, clay and pottery work, ceramics, attempts although hugely failed at sewing, paper mache, pastels, color pencils... Really if it's a new product I've gotten the interested and bought the product.  With the Mixed media journaling... I have jumped outside of my wide comfort zone. 

Once upon a time I was a procrastinator yet a perfectionist. Everything had to match and follow order. Lines had to be clean, corners were cut to exact measurements and if it wasn't right I threw it away. Only perfection in my eyes was acceptable in my art. In this journaling project the writing often looses out to the smearing of paint and stencils on a page. It is so much fun to smear color and just experience the paint that in itself is enough for me. I began to use the scraps mix the colors that didn't "match" use "oops" and odds and ends that I would have once upon a time..throw away. I was a perfectionist princess. While it did create great art..It did not develop me. 

Jumping into the mixed media journal tied back into my scrapbooking roots which I would print ever single picture I'd ever taken...orders of 500+ pictures at a time. I have over 25 12x12 scrapbooks stuffed to the seams of my family and son...Then I realized I didn't need every picture. 
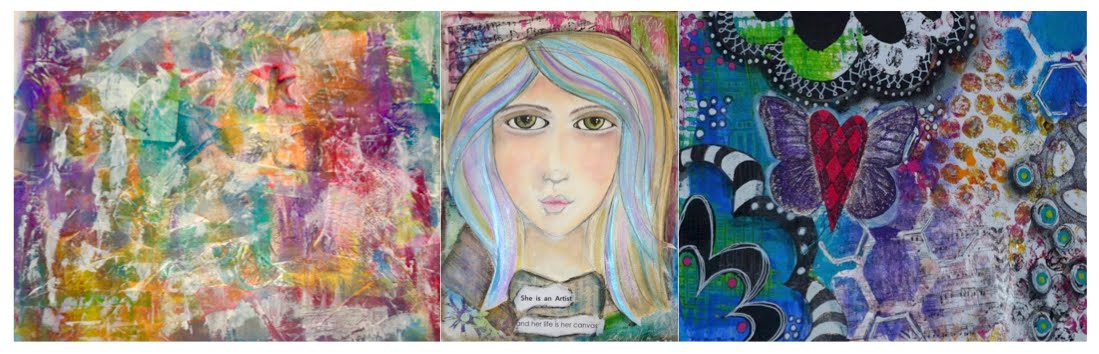
Once are becomes tedious and not fun I have to stop and walk away. I walked away for a long time until I found this journaling project and it has evolved in a few short months to things I could not even have imagined.  The top picture is a very basic idea of what I wanted from a page..something about ME. I had seen that others chose a word of the year so..sure why not. It seemed like a good idea at the time and then it was forgotten for awhile.  I only used smears of paint that were left thick and blobby, black pens to write and outline, some cut out circles and eventually added the gold paint pen..Still a pretty basic page really. 

Last night (July 24th) I opened my journal and gave up the prompt princess mode to create whatever came about.  The pages in the 2nd picture were stark white. I started with gesso..just to get a thick cover.  I smeared a little pink, then stenciled a Tim Holtz harlequin diamond pattern with a dark maroon red. Those stencils always bleed. I added more oranges and pinks and the brightness of the page just could not stop. I added more pinks and dots and finally some light pink gesso over a honeycomb stencil.. LOVE. Every piece of paper was something I had already made. I store them in a box with each piece folded over so I can see the colors like a swatch of fabric. I selected random pieces and just cut away. Stamped images I 3-D'd with "sticky upems" (nontechnical name developed years ago for the 3-D dots).  I used my newly developed script I've created with chalkboard paint. I love this black because it is flat and I can write on it easily. Anyways..the point of the story..Metamorphosis. 

I have grown with this art so much I can't even explain what it is.  I used colors not -typical to me. I created the whole thing organically just as it took shape. From white to finished a Metamorphosis. An organic creation from a perfectionist of rule..Metamorphosis. Realizing I have changed in an open minded way to accept whatever my art will be..Metamorphosis. 
It is such a free feeling and I can't wait to see where it goes from here. 
I love my word. 
Metamorphosis.

Sunday, July 6, 2014

Sugar Skulls Sunday Funday Art


I found a fun tutorial on pinterest ...NO WAY!!!  (sarcasm...that's my word of the day) in the blog ".  Every Day is a Holiday  CHECK IT OUT..seriously cool and full of ideas.  It is a Mixed Media art journal project from a magazine page. Not just any mixed media magazine page BUT a...

 Sugar Skull Magazine Mixed Media Tutorial
First off, I have to say I've never done one of these, and it so fun to create on the fly!

My page smelled really good like the magazine perfume..kinda fun! This was with her hair and my main painting.
After you gesso the face of person leaving the eyes and ability to see the mouth and nose...it is soooo fun to paint on magazine pages because of the texture. I painted and added all my details and cut it out. I used all scrappy under papers or extra random pieces I already had on hand.  I cut out the little flower shapes and nothing a little sharpie and charcoal shadowing can't handle and voila! Probably the most mixed of media pieces I have ever created. And today it's my favorite but then it's only 10:15 am.


I cut off all her hair and the extra magazine page. This is my under paper.

I traced around all my "flowers" which were really cut up blobs of paper with sharpie.

I added the butterfly sticker..I did NOT make it :)  Shaded and Done.

Now only if it were 500% smaller it would be a really great ATC! I also gessoed her nose a couple times to make the placement what I wanted it to be.  Once the eyes are darkened the angle and spacing get a little funky..but hey. I love her just the same!

Wednesday, June 25, 2014

Wing Tutorial...yeah a blog and first TUTORIAL!!

Wings …"How To"

A little bit about why I found these wings.  Wings mean different things to different people. For me, wings have been a common symbol through my art from the very beginning. For many years and still, I am in awe of the beauty of a butterfly. Typically I would draw them, but now I prefer to catch them in a photograph.  My other attachment to wings is a memorial of recognizing an unexpected and life altering loss and what that does to a person.  It represents the loss and at the same time the ability to be free, to fly, to be ungrounded.  My artistic spirit has always been just that.

I digress.  This project was a take on many different purchase options of expensive wood and stain, while beautiful and amazing, would not easily find a way into my home. 

I am happy to have this opportunity to share how I created something for so little from free, low cost and recycled materials, while it was not the goal, made them that much more innovative to create.

The Supply List:
1.    Time
2.    Patience
3.    Large sturdy cardboard…(appliance box)
4.    Lots and Lots of extra or cut down cardboard boxes
(a lot of people give away extra moving boxes on line)
5.    A good pair of scissors
6.    Tape (masking/painters/please don’t use your washi you won’t see it when you are done)
7.    Newspaper
8.    Flour and Water (a pan to heat it in)
9.    Primer spray paint
10.         Finishing spray paint ( I used an antique/oil rubbed bronze)
It is a metallic color and has a shimmery effect/not glittery
11.         Small bottle of black paint and a copper that you like


SO Here is the “How I did it”

CARDBOARD AND CUTTING

From the large sturdy cardboard, draw a wing shape the size that you want the total project to be.  Make sure you cut out the entire shape to accommodate the top short feathers and the long bottom tip feathers. Just an outline.  Mine are approximately 4 ½’ tall and 2 ‘wide.

Then bring your time and patience.  Each wing has approximately 70 individual cut top feathers. I cut one and then just traced and cut..(yes your hands will get sore from cutting.)

You will also cut 10 long feathers for the bottoms of each wing. (You will cut as many as you need to fit your wing)

                                                                                                                       
Start at right side point and work your way to the top

I started layering from the top to get the edge I wanted. This is not a precise, but what looks good to you.

(TIP: If you over lap feathers a certain way on your first wing… Make sure you use the same technique on the other wing so they fall the way they would on a birds wing.  If they all are overlapped in the same direction when you hang your wings, it will look pretty strange.)

Once you have your large templates, start at the top inside laying your feathers. I taped them to the top edge and to each other. They will move, but do your best to keep them where you want them. I taped each individual feather at its top like a flap. Start on the inside top and work your way out to the top arch. Once you have one layer of feathers, start on the next layer underneath.

Once you have all the small feathers taped down, lay out the long feathers overlapping each one in the same direction.

PAPER MACHE
 Once you have everything you like in place, it is time to make the paper mache. (MESSY fun YEAAHHHH!!!!)


I used a ½ cup flour to 1 cup water ratio. I also heat it on the stove in a span because it gets it smooth and it dries a more clear consistency so no bumps.


Lay the paper mache strips long ways making sure to fold the strip as you lay it into all the edges and nooks. You can do as many layer as you think will make a smooth finish. I think I did at least 2, probably 3.

You will need to lay strips over the edges all the way around to have a smooth finished look.

Sometimes the points on the feather will rip the paper.  That’s ok, just smooth it down to make sure you get a nice point on each feather and use another piece. You will you small pieces to fill in awkward spaces. Make sure you have little to no cracks. When you lay strips on the long feathers, make sure they are going in the direction of the feathers. If you lay then side to side instead of up and down, you will probably end up seeing the seam in the end.

Make sure all the this is dry before you paint.


PAINTING

Spray your entire finished paper mache’d wings with a white primer for white wings, or dark primer for the colors I used.


Make sure it is dry before you proceed.

Spray paint the oil rubbed bronze color (Krylon brand..I think, I got it at Fred Meyer).  Do as many coats as you need to cover the entire front and sides thoroughly. I set them up on blocks of wood in a cardboard box to paint so I could get to all sides without holding…and as always spray paint in the direction WITH the wind, not against….unless you really like that color and want to wear it for a few days…(Just a cautionary not, I did NOT paint myself J)


Once the antique bronze paint is dry use the black paint to dry brush the edges to have a shadowed finish. Also get up into the feathers to add texture and shadowing.  


Add shading up in these
crevices for detail.


Once the black paint is dry, use the copper color to dry brush over the black. Not entirely, the goal is to add color and dimension, not completely paint over.

Once you have all the paint on and it is dry, use picture hanging clips to use picture hang on the way with a monkey hook.

I hope you love them as much as I do!

Happy Creating!
~Kim


Am I an Artist?

Yes. The answer is definitely YES! I have been creating artistically whether it be with a paintbrush and canvas, film and camera, or pencil ...