Kim Lucas Designs ~ Infused Creativity

Kim Lucas Designs  ~ Infused Creativity
Mixed Media and Creative Artist & Photographer

Thursday, April 14, 2016

Who Knew ?!?!

I wipe off my brayer every time I'm done using it. As in: there is extra paint on my brayer and now I'm rolling it on a  piece of paper so it must be clean. WRONG!
My brayer had become more of an everlasting gobstopper!

BEFORE:


AFTER: (scrubbing with a brillo pad made of plastic, soaking, scrubbing with soap and finally, scraping aggressively with the back of a steak knife!)


Time to play with my "NEW"ly cleaned toy!


Wednesday, April 13, 2016

Intuitive Art - What Comes Out When I'm Not Trying

I like to work on large surfaces so my boundaries seem limitless. While it's not a wall size canvas this is "big" for my purposes. Metallic vintage rose wrapping paper, gold polk a dot washi tape, metallic acrylic paints and dripped inks. 


Cut out magazine girl meets gesso and some glitter paint. 
This cardboard template was for the pages of my planner, it became a piece of art in itself.


Watercolor is my weakest form art artistic expression. Watercolor paper and purple watercolor paints with a little help from a mauve acrylic. Holding the end of the brush quite loosely, this angel girl appeared and presented herself to me. 


Acrylic smears on a page for a rainy day of doodling. 


Altered CD. Just smearing colors for the background and these impressionistic tulips bloomed.


Back to the doodling board and pastels. Feathers were made with a stencil and I discovered etching the details with the  back of my brush to give them a realistic texture/look.


Creating textured square marked backgrounds. Sometimes with fingers, this one with a brush. Green.


Large mixed media pad pastels and collage. Attempt with neon Sharpies.  I'm not a fan.


My photograph. A ripped page of a National Geographic. "Quit eye'n my coffee". - Bitch


 Small scale wings with under paper.


I collaged and altered the cover of an old SINGER sewing book. I was simply making a background page and starting the idea of a girl. I was going to paint and color and shade her. After making the black marks for eyes and feature placement. This girl just came out of me. I don't know how or why. It is a complete 360 from my self-imposed style. She is by far one of my favorites in her simplicity. I heart her.


Keeping My Thoughts on Straight


Process art.  Sometimes I have an idea of a project I want to create, but most of the time, No. No I don't. After learning some sudden news and changes going on around me I ended up with a blank piece of mixed media tablet paper and the paints on my wall. This came out. All the colors were what I grabbed one after another to create layers of emotion.
4/10/16
I will call this one "I am stuck in a box" because that is all I seemed to be able to get out. One box after another, first with a finger paint technique and after, with a brush. Still stringent line boxes and small brush bristle 3-tap accents.  All of the scribbles in the boxes are my fast cursive pouring of thoughts from my brain to the paper with the back of the brush. I do this intentionally to scribble out the anger, hurt, confusion, whatever the feeling of the day may be.  So much is written in these boxes but all I see is a piece in colors I love.  I was stuck in my thoughts, paralyzed but not having any reaction at all.  A words slap in the face and numbing of the  brain.  Simple piece of information not making any sense except as individual pieces themselves. Facts. I could not stop there. I had to get to the core of the mess. The next painting let that out. 

I do not typically name paintings unless they present their names to me in the creation process.  The black lines were a repetitive action that produced the consistent numbing feeling of disbelief. Again with the boxes outlined in white gesso. Still too boxy, to "clean". 

Photographed wet - 4/10/16
The emotion was ready to be bled. To spill out. In a violent angry splatter of unconfined rage flung onto the paper, splatters reaching everything within reach on my table. When there was just past too much, I wiped some of the edges to clean up the mess, but you can't clean up a mess like that. It just smears and contaminates the rest of the work. Which perfectly exhibited what my thoughts were experiencing, now real, now tactile on the page.

*I am not trapped by the choices of others, but I am accepting the reality of what I was presented*
-Keeping my Thoughts on Straight.
Done.


Feather Texture Technique - YouTube Video

 Feather Textures can be drawn on top of any paint or medium with a pencil, pen or other writing utensil. To have your work evoke the feel of a real feather, add texture while the paint is wet. Check out how I do this in my new video "Feather Texture Technique"

This tag is a sample of the way a feather can look with this technique. I do not actually make this tag in the video. The video is a byproduct of this tag.   Up close I do add the black with a stabilo marks all pencil.  I do this to fill in the grooves of dry paint for depth. Enjoy!


I wanted to add a little more depth to this post for you to really see the finished idea of this feather texture. 
Feather stencil (it is originally light blue but this is just a loved one). I have three colors of paint above: turquoise, metallic purple, and plain old white paint.


I used the paint over the stencils creating the etched lines as in the video to show the spine and little details of the feather itself. This dries raised with depth and texture. 

The magic is in the stabilo marks-all pencil, or watercolor pencil if that's what you have available. Think creatively! Draw with the pencil around the main feather in a jagged fashion and coming in on some of the feather sides. Also give depth to the feather spine with a line of stabilo right down the middle.

Feather on the left: stabilo has been drawn over with a wet water paint brush. Nice thing here is the shading gets into the details. Pull single lines from he outer edge to the center in random places. If there is too much black shading for you, use a wet brush or baby wipe to pull it up. The feather on the right is pre-wetted stabilo.


This is how colorful and fabulous feathers become when they are all done and cut out. Just a hint of color behind and through so they aren't flat and shading. I feel like they are "fluffy" when I look at them and want to just touch them!  Hope you enjoyed this and are inspired by creativity!

Friday, March 11, 2016

Happy Accident Art # 2 - Circle Punch Tags

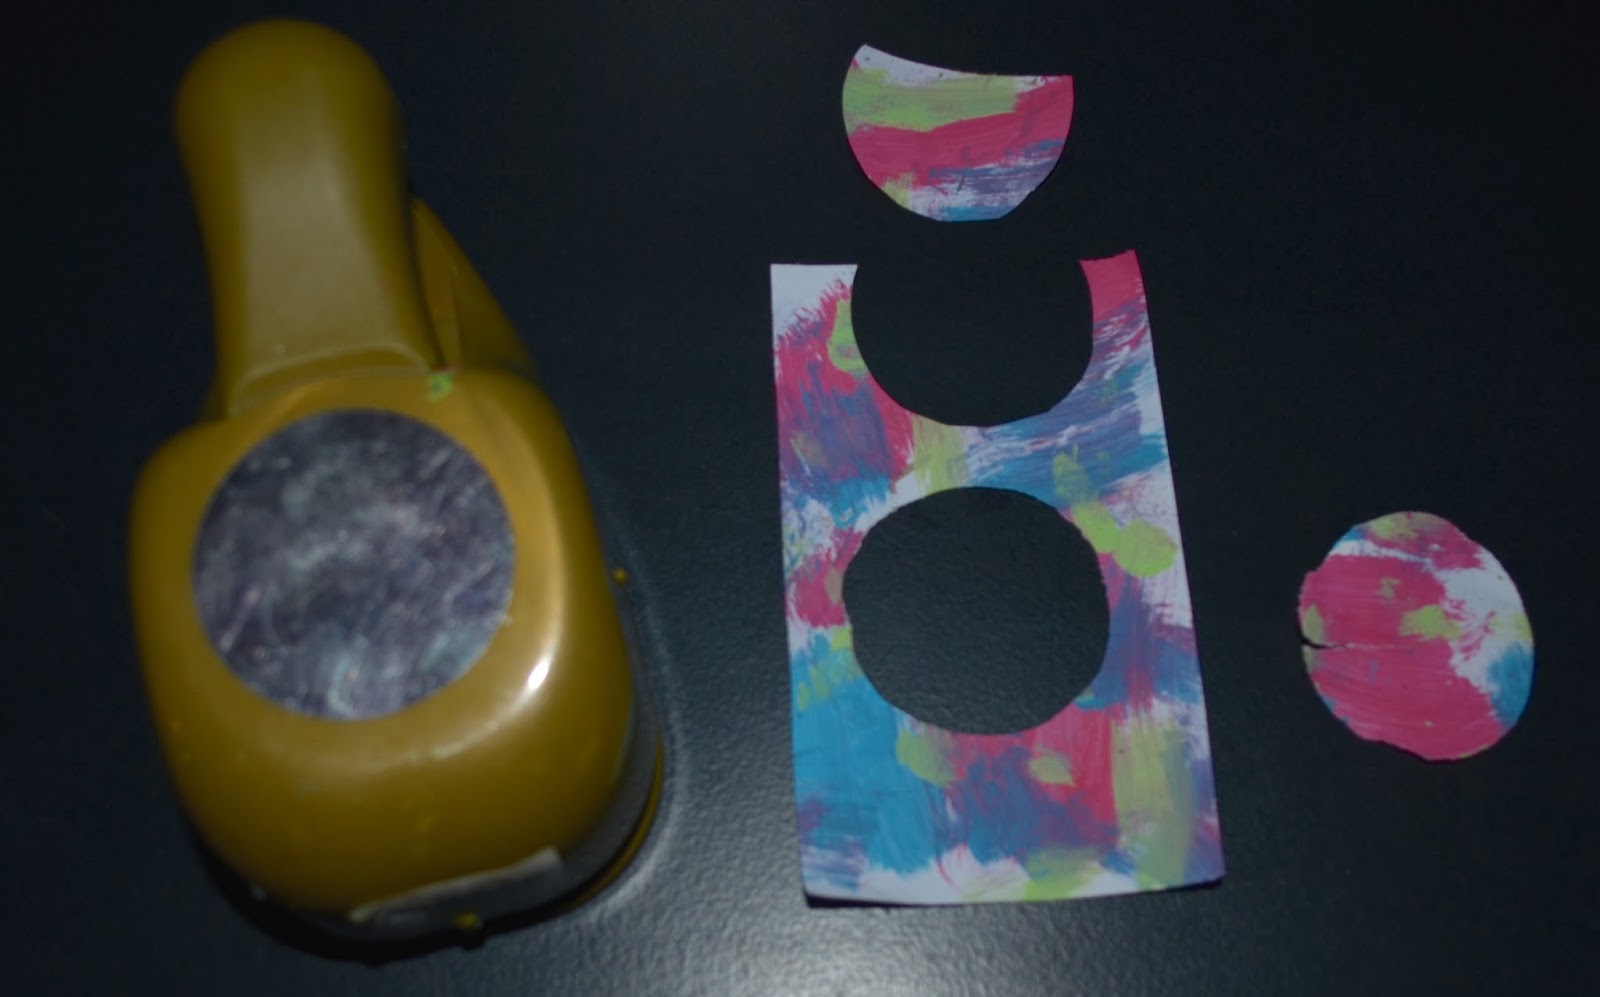
When I play with my art supplies things magically happen. Today's accident was provoked by the use to scrap paper, a circle punch and a tag. Yup that's it.  When I send a swap I usually stick to the basics.  Adding too much increases the postage and time I have to use to keep up to date. . A Circle themed ATC inspired the creation of Circle Tags. Such a fun easy geometric tag! Can also use for an ATC :)

Circle punch 2 holes from a tag. As many as you want keeping the circles intact.

Choose another color paper for the next layer. Punch two circles in different places than on the tag. They don't have to be  whole circles. 

Find a third color or style paper. I like this stamped piece. Cut two partial circles from 2 different spots than the previous papers. 

Find a final contrasting piece of paper cut to the shape of the tag.   This piece will be the bad of the tag. No circles are cut from this piece. Leave it whole. 

Flip your tag over and glue all around the circles. I just used a glue stick here. Make sure you get glue on those little thin strips as well.


Add the first layer of cut circles to the back the tag so the colors show through.  Look at the placement from the front before adhering permanently.

Flip over the tag and all glue to the entire back once again. 

Flip the tag over to check placement of the 2nd  piece  of paper.  In this tag the 2nd paper layer is the stamped words.
Make sure you leave small spaces for your next color to show through. You can flip the papers any way you want to see the color through the tag. 

Once again, flip to the back and add more glue to the entire tag. 


You can still see the edges around the tags. Now cut all the excess off at one time. You can undercut a little so no paper shows through except through the circles. I had gluey fingers with this one. Make sure you have clean hands or let the glue dry between.
Here are the final tags. You can also draw doodles on the front with black or white pens to hi light the circles or add petals like flowers. Geometric. Colorful. Fun. Easy :) Happy with this accident for sure! 

Note: My circle punch is a beast to use. I DO NOT love it. It catches edges and tears them EVERY time. However, I do have extra circles for journal pages, swaps, numbers on a calendar...

Hope you have fun creating some circle tags yourself!


Monday, March 7, 2016

Play

Play with your art supplies that make you happy.  Scrape paint for no reason.  Choose colors for the fact that you have them, and by all means fingerprint to your hearts content. It's been awhile between swaps and creating. My family thinks I have all this time to make art, and while I am creating a swap I am having fun.... however, there is a difference between creating something with intent and just playing. I haven't allowed myself to play for sometime and that's where things in my mind get messy. I don't have time to create and breathe. Really all I want to do is play and all is right in the world again. Here is my piece of play from last night.


Paint dots and smudge marks first ..THEN added the background over it. Added bright stringent dark purple sharpie around the pink dots on the left..didn't care for that. So I gessoed them, added punchinella stenciled marks added more light green with my fingers. 

I did not take process pictures because it's not about the process its about playing. What you can't see is that I had 2 different pages made when I started. They were both blank, but one got dots and the other received a generous smearing of orange and yellow paints. Added a half circle on the upper right of the spine that was all alone. I then added a half circle on the left which was obviously lower but there was an obvious "disconnect". 

A few swirls of blue stabile and wa-la! What you see here is a start to a journaling page. 
Disconnect for me means this: 
1) I have a disconnect in my life with who I am supposed to or want to be
2) I am not connected in my art so there is a disconnect with the circles
3) I want to keep all electronics aside from art and blogging to a minimal. Disconnect from the routine of nothing. 
4) Nature and disconnect. I have fallen away from photography in a way that has me very narrow minded in seeing the beauty of art and nature in an organic form. I took my camera out into the woods in the rain and caught a few moments that allowed me to reconnect with my art and fresh air. Much needed. 

Kim Lucas - Blurry Space - Don't need definition to experience the idea

Kim Lucas- Forest Solitude

Kim Lucas- Ivy


Kim Lucas - Rainbow Branches


Kim Lucas - Doodles in Nature
Kim Lucas - I <3 (heart)  This Tree

Kim Lucas - Sunlight

Kim Lucas- Patterns in Nature

Kim Lucas- No Title


Kim Lucas- My drink of the day. (Looks photoshopped) Totally real.. I was drinking it!

Kim Lucas- New and Old Beauty


Kim Lucas - You Can Play at the End of the Tree Tunnel

Kim Lucas - Random Designs and Color = Art


Am I an Artist?

Yes. The answer is definitely YES! I have been creating artistically whether it be with a paintbrush and canvas, film and camera, or pencil ...