
Artist's Lounge October Artist of the Month
Alice in Wonderland Small Arts Swap
Presented by Artist: Kim Lucas
Hello Mixed Media friends, whatever group, page, challenge you belong too, I'm excited to share a tutorial for the month of October in the group "Artist's Lounge." I will cross post as well because I had such a blast creating this project and documenting it to share.
I am not a big fan of creating videos of myself creating art. There is too much start and stop, and once I get started I like to finish. That being said I chose to focus this tutorial around making a small arts swap. I know many of us do this and create these swaps in groups, and sometimes there are partners that don't understand the meaning or the quality of a small arts swap. This swap was one I signed up for but I will show you a bunch of fun techniques about the way I create three different mixed-media pieces. The first is a mixed media 3-piece small canvas altered art, the second is a large packing tag mixed media using textures and embellishments, and the third is a large playing card altered art, mixed media piece.
One of the things I notice when making a mixed media swap with a theme, is what about the theme is well known. Alice in Wonderland, you can draw, sketch, make your own version, but they are a very well known entity for sure. I appreciate whatever I receive in mixed media small arts swaps, but it's nice when they are easily recognizable or when you don't have time to sit down and create a hand-drawn piece, to still create with quality.
I have presented this 3 piece small arts tutorial in picture form. I wrote comments directly on the pictures so if you just want to flip through pictures or reference one while trying a technique you can do so easily. I had a blast creating this tutorial and the art pieces, I hope you learn something new and enjoy the project!
3 part tall Alice canvas-mixed media

I found this small canvas pack of 9 -4x4 canvases at Ross for $5.99. You can find them at almost any art store as well. They are a wrapped canvas so you can hang them separately to create interest. I had just made this under paper using reds and blues. The paper itself is a shiny white office type paper. I don't generally have an "under paper" as you can see the messiness of my desk, but I do have a place to scrape off extra paint, smudges, wipe stencils brushes etc. How fitting that the colors would work for the project I wanted to create.


I wanted to show you that I keep all of my old dried brushes. I am horrible at cleaning them, but they are nice for texture tools. The splotchy design it creates makes a nice pattern. I am displaying some of my products I used here but will have a comprehensive list down below. I love punchinella, don't know where to get it. I was happily happy mailed this piece long ago. I use a variety of paints as well. I just like to throw color down so I'm not about fancy paints. Generally, I use the Anita's Acrylics and sometimes the one of 5 heavy body Liquitex paints I own just because I LOVE that bright blue. The blue acrylic I found in a bin at a goodwill outlet..by the pound literally 5 cents! Brand new. I also use white gesso as my paint. I like the Liquitex white it seems to spread evenly and I LOVE to mix it will spray inks. You will see that later.


Again I love thrift store finds as I'm sure many of us do. This isn't an original Alice in Wonderland, but still one of the early versions of the original stories. I like to make copies of the pages and I really liked the idea of using the tall Alice for the divided canvases. The picture in the book wasn't quite large enough, so I enlarged it to make it more of an appropriate size for my project. I also copied pages with the White Rabbit as well as the Queen of Hearts chess style. Ironically, my family and I just recently watched the Tim Burton version of Alice in Wonderland.


I love inks. I love spray inks. I don't love how they mix into everything else once activated with water. Simple solution for this. Once the ink is dry, I us a very soft bristled flat brush and a light touch with a layer of mod podge over top. It may smear a small amount of the ink and tint the mod podge a bit (so don't double dip) but it seals the color and allows me to work over it.

I had leftover modeling paste on my palette from the texture on the tag part of this project, so I decided to paint some onto Alice's apron for texture and interest. You will also see it painted on the sleeves and neck of her shirt. The legs are gessoed with white to make them appear as though she is wearing stockings.


Here is an easy comparison of modifying an existing picture drawn by someone else and altering it to make it your own. I love to draw, don't get me wrong, but time is something I am not finding a lot of lately. Maybe I need to fall down a rabbit hole. I loved this image because it fit the idea of separate stretched canvases. I used acrylic paint to color her arms and neck. I actually added the Stabilo marks all black pencil before I colored her with paint. The surface was rather slick so I used a water brush and baby wipe to get the shadow I wanted. I went back and added smudged Stabilo to maintain the dark black I wanted.

 I darkened Alice's features with a regular #2 pencil. I used to outline everything in black ink, but I have found that pencil is more shadowing and less striking against the features. This is a picture of the water brush I use from my gelatos. It's been pretty good but lately it's had some issues with not flowing well.
White Rabbit Tag - "I'm Late, I'm Late"
On to my next Adventure in Wonderland. I wanted to incorporate the White Rabbit with his famous line "I'm late, I'm late, for a very important date" because in my busy life of kids tonsils removed, a birthday, a sickness, a fund run, a shirt design..and well you get the point, I had to let my swap partner know, this swap would in fact be late. Everyone tries their hardest and I am the first one to tell you it's disheartening to not receive on time..
I started with a large manilla mailing tag. I have unlimited access to these (shhh!). Anyways, it's easier to color the whole background in one color first and then to add layers. I LOVE this craft smart paint in Champagne Pearl. It is shiny and dries translucent. There is a sample below where the gold drop looks as though it is the true color of the paint, and then dry..it's a nice shiny sheer color. I don't wait for paint to dry. I am too impatient. I use my heat embossing gun on EVERYTHING, or I scrape paint so thin it is dry immediately for the next layer.


Another fun art supply that I love is modeling paste. I've had this tube for about a year, but it's almost time for a new one. Good thing the birthday shopping spree to Dick Blick's is this week!!! I have a thing for the harlequin diamond pattern as well. This is a well used and loved stencil by the famous artist known as Tim Holtz.


As you can see my "palette" is nothing more than a clear plastic plate. Why? I have a ton of them, they are cheap and I am terrible at cleaning brushes and paint before it dries so I just use them. I globbed on a good squeeze of modeling paste to the plate along with some red and metallic blue craft paint. Again only using Anita's brand or something inexpensive. I decided to use my scraping card to mix the colors. Once they were mixed I loaded up red onto the edge of my card to swipe on my stencil. I start in a random place so that I don't have an oddly square box of a pattern like the edges of the stencil itself. After the red, I scraped in some of the blue kind of blending them together. This paste is thick and it takes quite a bit to fill in this area, but the texture it provides is A-Mazing!!!


Oooooooh..drool over the yummy texture. I don't wait for this to dry either. After I heat it with my embossing gun, it does this puffy look thing and as soon as it cools, I just press it down. I'm not so particular that I want these layered patterns to be smooth and flat.


Distressing the edges with a black Staz-on ink pad. I use the stamp pad directly at an angle against the edges of the tag. I make sure to get all of the edges especially the top. It's an odd look to only do the sides and bottom even if there is a metal piece in the way. I used mod podge to glue down my rabbit on the tag. In the next pictures you can see I placed the White Rabbit in an area that complimented the colored modeling paste. Once you dry the paste, if you try to glue a flat image over it...you will get a wrinkly mess. I did not on this one, but it's just something to be aware of.


I had some extra light blue paint left on my brush from painting the Alice canvases so I used my wet leftover brush to make the line patterns for more interest on the tag.


 Would you look at the hardware on that tray??? Tim Holtz for the win..mostly, and some random garage nuts and bolts..

Iridescent Medium..next best thing to glitter without the mess. It dries to a clear and glittery shimmery goodness. Perfect for a White Rabbit that you don't want to lose all the details on! Added the medium on his head, ears, and legs. A red Prismacolor Premier Pencil was used on the hearts. A little splash of gesso spritzed with Dylusions lemon yellow spray ink in splatters.


Now for my favorite part of this tag. The Mod Podge Dimensional Magic! It truly is magic, and no they don't pay me. It's a cloudy gel that dries clear and gives a shine and 3-dness to the piece. I added some of this to the hearts on the White Rabbit. I will at some point add the "I'm late" part but this is the "finished look" for making this tag.


Queen of Hearts Large Playing Card "Meet Um"
 The grand finale. I found this large deck of playing cards at Value Village and thought they were an awesome deal for $1.99, turns out you can get them at the dollar store. They make great ATC's, book pages, journal pages, and small arts canvases. I chose from the suit of hearts but couldn't give up my queen so I added one on behalf of Wonderland.
I used the same background paper from the Alice canvases to cover the back of this card. (NOTE: mod podge dries clear and smooth. It can peel right off once it's dry. Glue appropriately) I like to get all of the edges covered with the mod podge or adhesive. I cut the piece to the height of the card and ripped the sides to show the number and hearts suit. I placed the colored piece upside down on a sheet protector. Next, I liberally added mod podge covering all the way over the edges. No problem. I flip the sheet protector over revealing the colored art side allowing me to place it firmly where it belongs AND I don't get gluey sticky hands!


 Images copied from my book to add to the cards. I like the juxtaposition of the "traditional" vs. "Burton" Queen of hearts.
 Drying white gesso where I want to add my drawing. I used a baby wipe to smear some of the dry gesso away to make it show more color. Sometimes I forget where I put things on my dest so when I pick something up..this sort of mess happens. Here is the fun part where I like to be creative with what I can make things do. I put a drop of white gesso on the top of the card. I spray it with the dylusions ink spray causing the gesso to become more fluid..and colorful. The gesso and spray don't completely MIX together, but create a cloud like color with different values of blue.


This was splattered with the yellow ink mixed with white gesso.
Washi tape is hiding in there as well. Green dylusions ink was sprayed at the bottom of the card soit appears as if they are on a hill. Below is my best attempt at sealing dylusions spray ink. You will notice that you can still see brush marks and the color does smear..but minimally for a project I am going to cover that space of with something else.

Have I mentioned how much I love my Prismacolor Premier Colored Pencils?? They blend easily and color in a very meditative way..it's great therapy! These are the red pencils I chose for the queens hair which I colored in circles and swirls.


Almost there. I did use some red acrylic paint around the hair pieces to help give it more texture and definition. A stabilo marks all black pencil was used to shadow around the face and create depth. I wanted to keep her features, again altering it to make my own. The face is painted smoothly with white gesso because her face is in fact that white. More often than not, I used white gesso as white paint.
Here are all three pieces in progress. I finished the queen rather quickly after completing her hair. Blue eyeshadow is added with Prisma color Premier bright blue pencil and details are drawn with a regular #2 pencil. Much more realistic than the stark line of a sharp black pen.
Here are all three pieces in progress. I finished the queen rather quickly after completing her hair. Blue eyeshadow is added with Prisma color Premier bright blue pencil and details are drawn with a regular #2 pencil. Much more realistic than the stark line of a sharp black pen.


Other Alice in Wonderland inspired pieces I've created over time


 |
| Mad Hatter Steampunk Octopus |
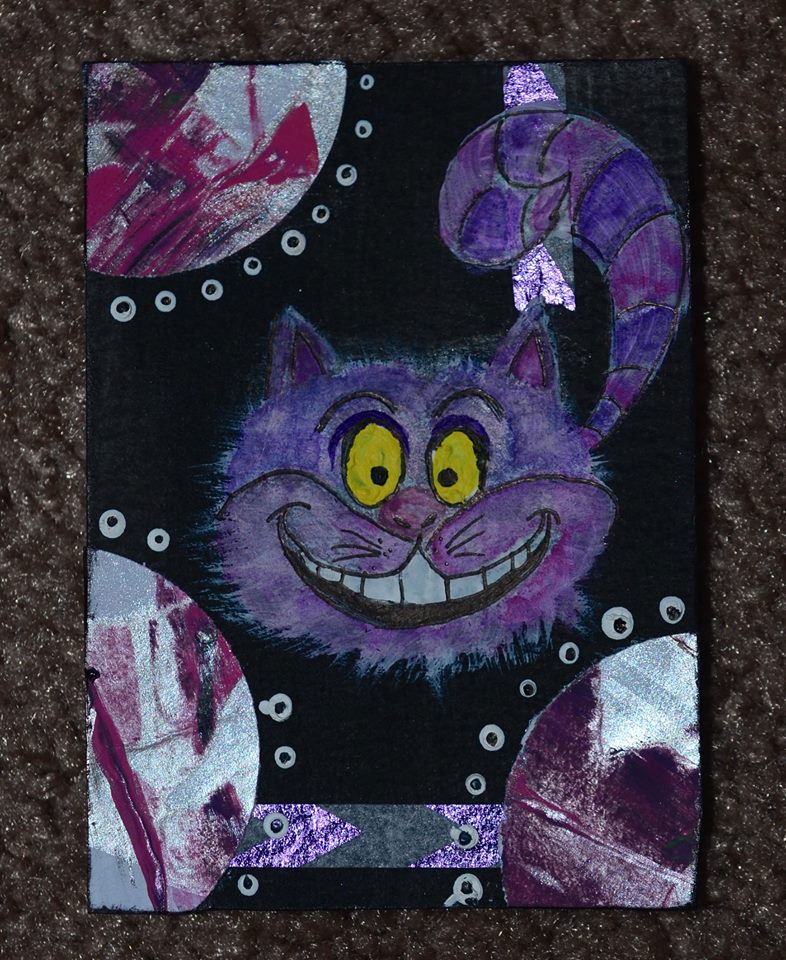 |
| Cheshire Cat ATC |
 |
| Alice and the Hatter mash up in this ATC. |


Mixed Media collage canvas. I made the paper doll Alice and the felt hat up top. All sorts of fun going on here. I think the Alice tag on the right was one of my first Alice pieces in these groups.
My workspace/desk


I create messy. I don't take pretty pictures to show you my sparkly nice space, because rarely is it ever!!
Comprehensive Supply List
I will update this as I have time. This tutorial was the focus :)
If you have any other questions about the art here or on my blog, feel free to ask me or send a me a pm.
Background Piece:
4x4 9-Piece Artist Canvas by Penneli
Large Manilla Shipping Tag, measures: 3 x 6.25"
Large Playing card measures: 5 x 7"
Tools:
Water brush (Design water brush T-Prime)
Paper Cutter
Scissors
Dried out brush for textures
Credit card
Punchinella
Heat tool/Embossing gun for drying
Brush for gesso
Clear Sheet protector
Embellishments:
Washi tape: 3m Blue design at Target
Pen nib (any art store/vintage supply)
Clock: Tim Holtz
Mediums:
Liquitex Professional White Gesso
Liquitex Basics Modeling Paste
Liquitex Basics Iridescent Medium
Mod Podge Dimensional Magic
Ink:
Staz-On Jet Black permanent ink pad
Dylusions Spray Inks
Blue: London Blue
Green: Fresh Lime
Yellow: Lemon Zest
Stencils:
Tim Holtz Clocks
Tim Holtz Harlequinn THS016
(purchased as a set)
Papers:
Pre painted under paper color of your choice
Thrift Store book of choice fun for themes
Black and White Copied papers
Scraps of painted paper
Adhesives:
MOD PODGE Plaid Brand- Matte
Elmer School Glue stick Heavy Duty in purple
Writing Utensils:
#2 regular pencil for outlining
Stabilo Marks all pencil in black
Watercolor pencil: black (student brand)
Prisma color Premier Colored Pencils
PC904 light cerulean blue
PC922 Poppy Red
PC924 Crimson Red
PC926 Carmine Red
PC949 Silver
PC950 Metallic Gold
Paints:
Anita's Acrylics
11105 Rivera Tan
11204 Metallic Sapphire
11003 True Red
11179 Azure
111028 Navy Blue
11150 Island Blue
Americana Acrylic
Lamp (ebony) Black
Folk Art
679 Turner's Yellow
Simply Acrylic
Dark Blue
Craft Smart
Champagne Pearl
Liquitex Heavy Body Acrylic
Brilliant Blue
(And this is why I have a ton of art stuff...this was one project!)
Happy Creating!
Kim


No comments:
Post a Comment
Thoughts and feedback welcome here!